Loading a Texture and Drawing the Background
Heya 👋
In this chapter we will load a texture, draw it and make it scroll (infinitely) in the screen.
Demo of this chapter done:
If you haven't read the previous chapter yet: Creating the Project and Understanding the Game1 Class (part 1)
Summary:
- Loading the texture
- Using the MGCB Editor
- Drawing a texture
- About the SpriteBatch.Draw
- Why the top-left corner?
- What is the Vector2 and Color?
- Color tint and Opacity
- Drawing part of a texture
- Texture packing
- Reordering the Draw calls
- Region of a texture
- Rescaling
- Destination rectangle parameter
- Scale (and the origin) parameter
- Rotating
- Setting up the window size
- Drawing and Scrolling the Background
Loading the texture
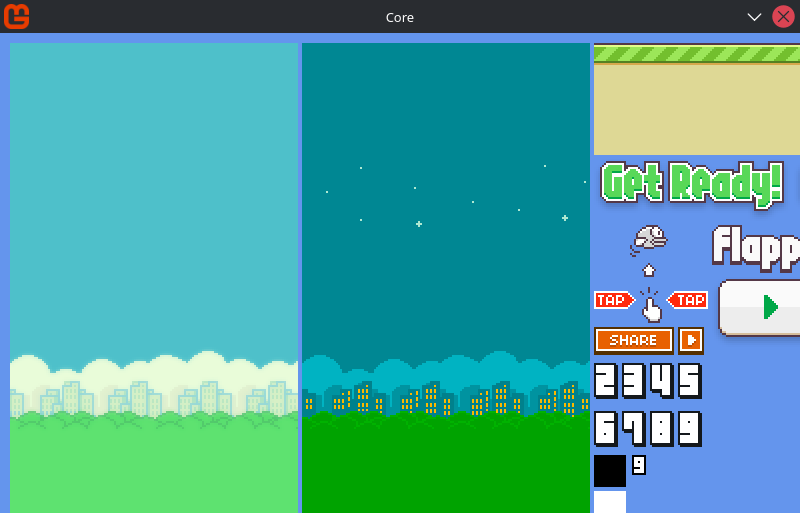
This is the image that we will draw:
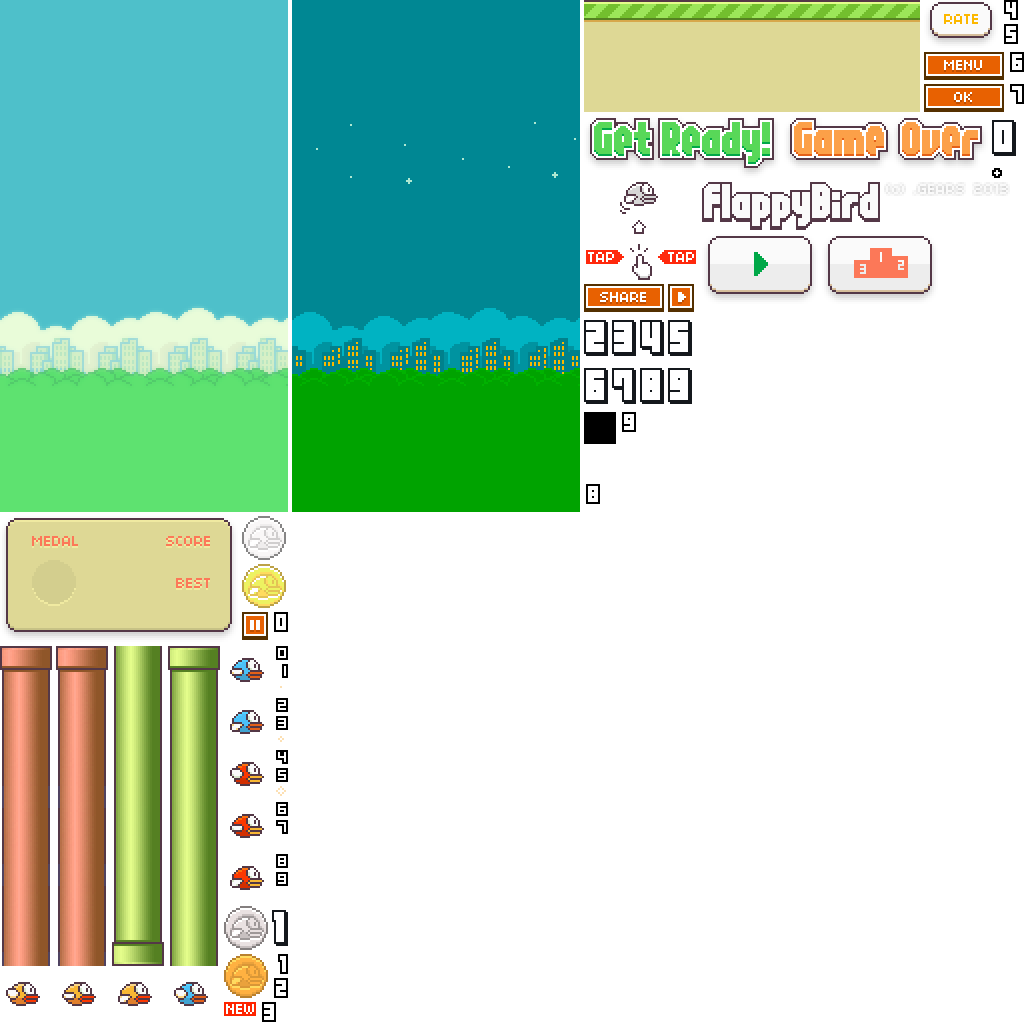
If you are questioning yourself if I did this image, for you I'll say: nah! I just stole it from Sprites-Resources.
⚠️ Obviously without a proper license you can't use this image comercially, but for learning purposes it's fine.
Currently there is one (or two) way of loading assets into our project:
Using the MGCB Editor
This is the old way of loading assets in MonoGame, it is kinda inconvenient, but it do the job.
What the content pipeline does is process raw media (like image and audio) into an
optimized format for fast reading. Usually the produced result is a .xnb (have you ever looked inside
your Terraria or Stardew Valley's Content directory?)
💡 You can read more about this optimization proccess from the content pipeline here: Why use the Content Pipeline | MonoGame
The problem of this tool is that everytime you need to import an asset you need to open it, you cannot automate it and if you are a Linux user like me... MAUI sucks.
🤟 Apparently the mgcb editor will be replaced in the future by a new content pipeline or at least it'll gain a new competitor that will be potentially better.
It is installed by default (until MonoGame 3.8.5 at least) and you can open it by opening a terminal in the root of
your project and running dotnet mgcb-editor Content/Content.mgcb
🤕 If you are getting some error saying something that mgcb-editor don't exists, try to run
dotnet tool restore (in the root of your project) and opening it again.
You will see something like this when it is open:
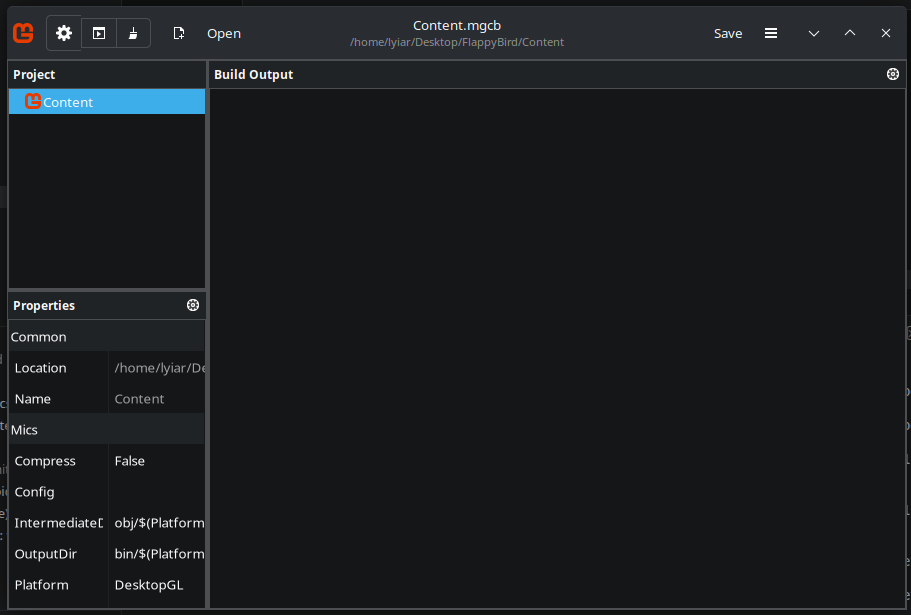
We can add our image by right clicking in the Content field in the Project panel, going to Add and then Existing Item...
You will see a prompt like this when selecting your image:
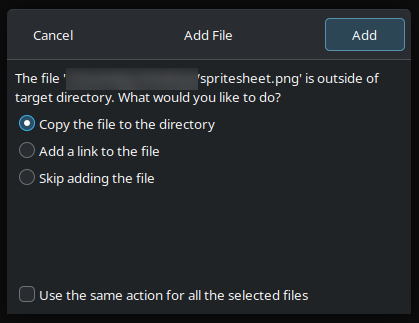
- Copy the file to the directory: will create a copy of the original file in the Content directory of your project. This is usually the common and safe approach.
- Add a link to the file: will just register a reference to the file in our
Content.mgcbwithout copying the original file. The problem with this approach is that, if you remove or move the original file before compiling it (running the process that creates the optimized version of the file) you will get an error about the missing file. - Skip adding the file: will do... nothing... it don't even change the
.mgcbfile, so... 🤔
By the way, did you noticed some other options like New Folder and Rename?
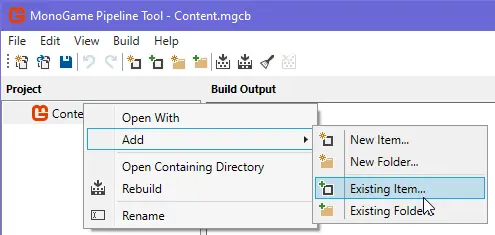
When you select the Rename option you can set the name of the optimized file that the content pipeline will produce for some file.
The New Folder option will indeed create a directory inside the Content folder of the project and also in the build of our project, which means that you will need to consider it when specifying the path of some asset.
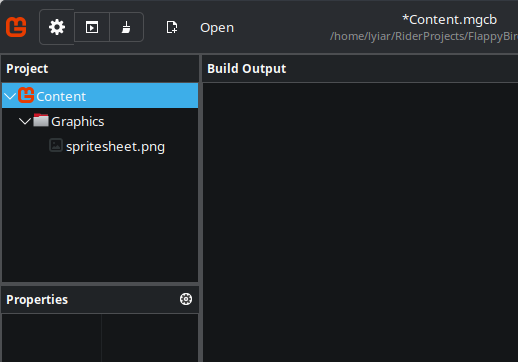
By the way, perhaps you'd found a Build button in the MGCB Editor, if you press it right now, the content pipeline will process all the files that you added and will produce some .xnb files.
If you have ignored it, when you build your project, the content pipeline will be triggered to proccess your files automatically. Then, the only thing you need to ensure is that the file to be process exists and you saved your .mgcb file before closing the MGCB Editor.
Drawing a texture
Is very easy to draw a texture in MonoGame's actually, what we need is simply:
- Load the texture (Texture2D) into the code.
- Have a valid instance of a SpriteBatch
- Draw the texture ;)
private SpriteBatch _spriteBatch;
private Texture2D _texture;

protected override void LoadContent() {
    _spriteBatch = new SpriteBatch(GraphicsDevice);
    _texture = Content.Load<Texture2D>("Graphics/spritesheet");
}

protected override void Draw(GameTime gameTime) {
    _spriteBatch.Begin();
    _spriteBatch.Draw(_texture, new Vector2(10f), Color.White);
    _spriteBatch.End();
}
This line:
Content.Load<Texture2D>("Graphics/spritesheet")
Is how we load things into MonoGame, more specifically the ones processed with the content builder. The Texture2D is the type (or how) we want that our asset be treated.
Note that I didn't put the file extension while I was specifying the file path. The ContentManager already knows how to handle and what is the format of the asset (or at least what format is expects the file to have) that you're loading.
This piece:
_spriteBatch.Begin();
_spriteBatch.Draw(_texture, new Vector2(10f), Color.White);
_spriteBatch.End();
Is the responsible for drawing our texture.
If you read all the part 1 of this course, you should remember that in some moment I mentioned that the SpriteBatch do batching when drawing a texture, well there is it.
When you call Begin() you start the batching process, then every call to Draw(...) will store some information inside the SpriteBatch and when: End() is called, the texture changes or when the SpriteBatch becomes full is that the information is flushed to the GPU and your draw is done.
Basically, always when you want to draw something with the SpriteBatch, every call to Draw() must be between Begin() and End().
Simple, right?
About the SpriteBatch.Draw
Perhaps you noticed more than an image being drawn and the fact that with the SpriteBatch you always need to call Begin() before any Draw and finish by calling End():
Why the top-left corner?
The top-left corner of the screen (in MonoGame) being the origin of our drawn is just a (convenient) convention that someone in the XNA age chose and MonoGame inherited.
Actually, for the graphical library (OpenGL in our case) the origin point is at the center of the screen and what for us is 0 pixels at the left and 640 pixels at the right, for it (OpenGL) is -1.0 (left) and 1.0 (right) (also called as normalized coordinates).
Therefore, work in this unit (normalized coordinates) is very incovenient then someone created a mathematical structure that take our coordinates in pixel and convert them into the format that OpenGL expects, formally called Projection Matrix.
The image in your monitor is usually processed and transmitted line by line, from left to right, from top to bottom.
I changed the tangent quickly, didn't it? 😅
So someone take these two things, merged them and now we have: a mathematical structure that converts our pixels coordinates into "OpenGL coordinates" and also make the top-left corner of the screen be the origin (0, 0) for us, to follow the pattern as the monitor transmit the image for us.
You definitely don't need to bother about this (because this subject is kinda big and confuse), just know that the top-left corner being the origin of our drawing is just because someone choose.
👻 The top-left corner of the screen being the origin (0,0) isn't exclusive from MonoGame, many other engines and frameworks like Godot (the 2D editor), GameMaker, PhaserJS, Construct also use this pattern.
And as if that weren't enough, the y-axis points down. 😬
In the traditional cartesian plane the x-axis points right and the y-axis points up.
But in MonoGame (and many other engines/frameworks), since the origin is at the top-left corner, the y-axis points down.
So, if you want to move left you will decrease from x and to move right you increase x, like the cartesian plane. But, if you want to move down, you need to increase the y-axis, and decrease it to move up.
Nice, we will play with matrices in the future (for creating a simple camera for example), but for now you just need to know that: always when you draw something, the position (0,0) is the top-left corner of the screen and when you add into Y, you (visually) are moving down.
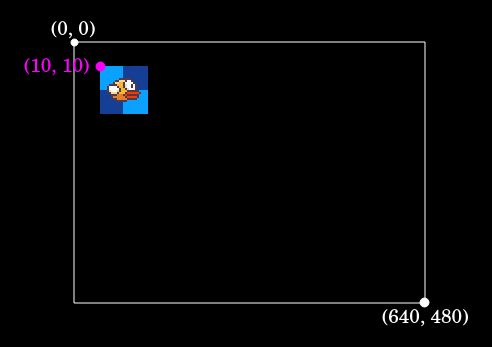
By the way, the anchor point of your sprite/image (the magenta dot) is also set at the top left corner of the image. If you change from new Vector2(10f) to new Vector2(0f) the image will be positioned from it's top-left corner and will be placed at the top-left corner of the screen:
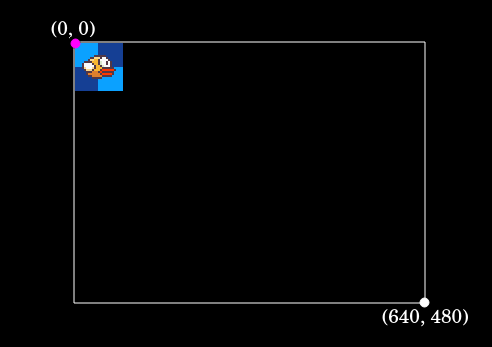
And logically, if you do something like this new Vector2(640f, 0f) (position the x of the image at 640px and the y at 0px):
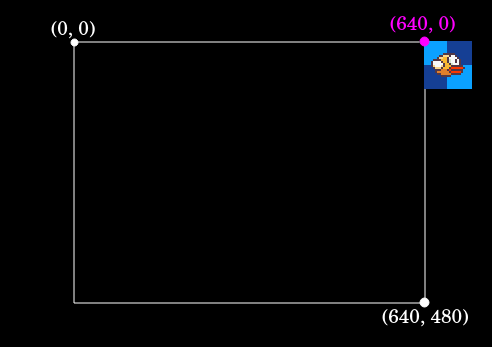
Since the width of the screen is exactly 640px, then positioning the sprite at (640, 0) will put it outside of the screen.
We will see more of this anchor/origin point of the sprite soon.
What is the Vector2 and Color?
Vector2 is simply a struct that contains two fields: X and Y and them usually represents position in space.
You will usually use Vector2 (or Vector3, the variant usually for 3D) to represent position, velocity, impulse, size and anything that have two dimensions.
new Vector2(); // both x and y will be 0 by default
new Vector2(5f); // set both x and y to 5 (or any other value).
new Vector2(5f, 10f) // set x to 5 and y to 10
The Color struct, as the name suggest, represents a color. It contains some fields like R, G, B, A.
Most of the time you will use the builtin colors that the Color struct provides like the Color.White.
But if you want create a new color, the Color struct provides many overloads:
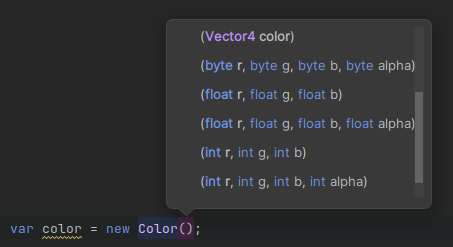
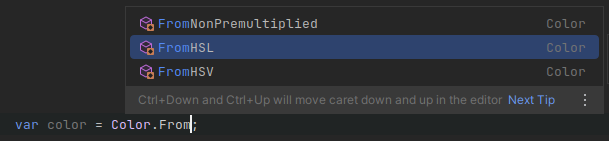
And also some useful static methods for creating new colors:
Color tint and Opacity
_spriteBatch.Draw(..., Color.White);
The reason why we need to "provide a color" while drawing a texture is to allow us to both tint our texture and also change its opacity (I think lol).
Anyway, when you use a white color, the texture will be rendered with it's original colors. When you use any other different from white, it will be "tinted?":
Sorry i'm not a native english speaker, so don't get surprised with me saying some shits or inventing words that doesn't exists 😂
_spriteBatch.Draw(_texture, new Vector2(10f), Color.Red);
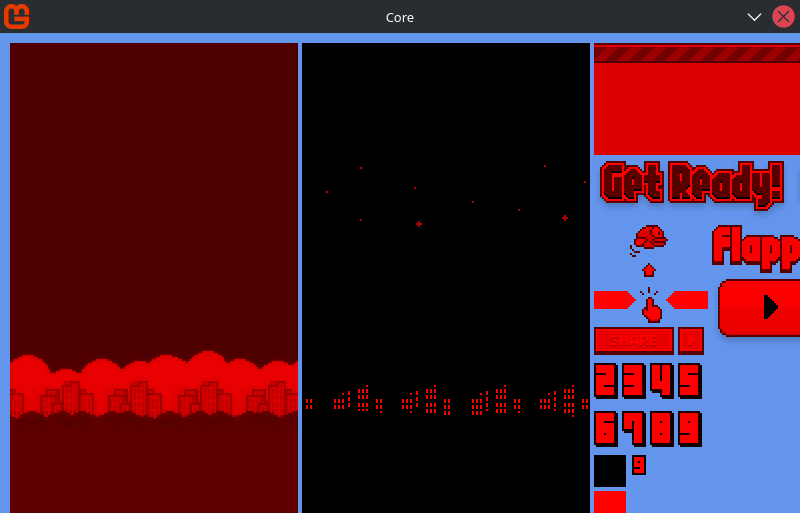
And if you multiply the color by some value between 0.0 to 1.0:
_spriteBatch.Draw(_texture, new Vector2(10f), Color.White * 0.5f);
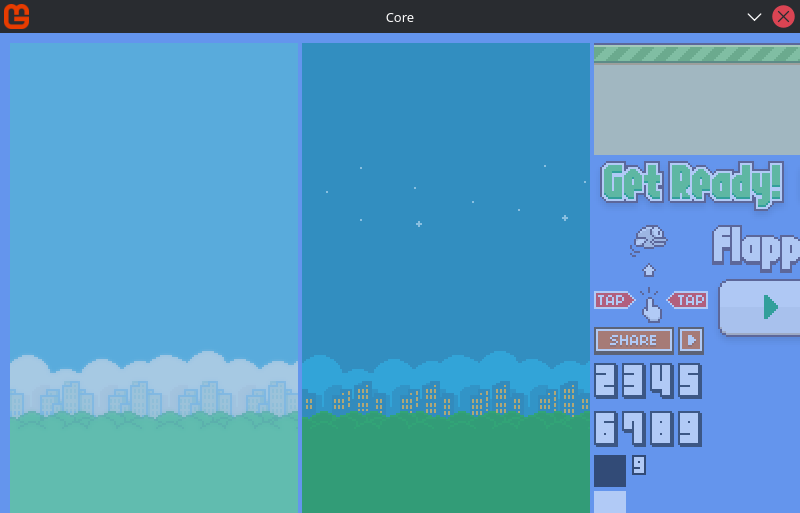
Drawing part of a texture
MonoGame provides many overloads for the SpriteBatch.Draw, here a list of them:
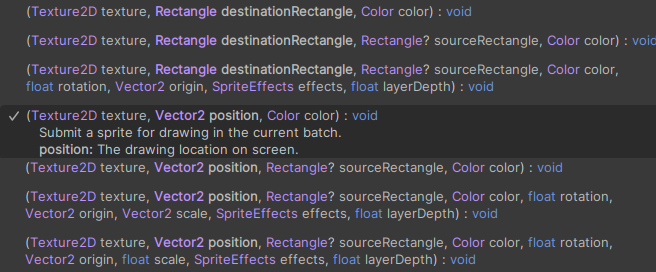
The one we are using is the most basic, then let's try another very useful:
_spriteBatch.Draw(_texture, new Vector2(), new Rectangle(0, 0, 288, 512), Color.White);
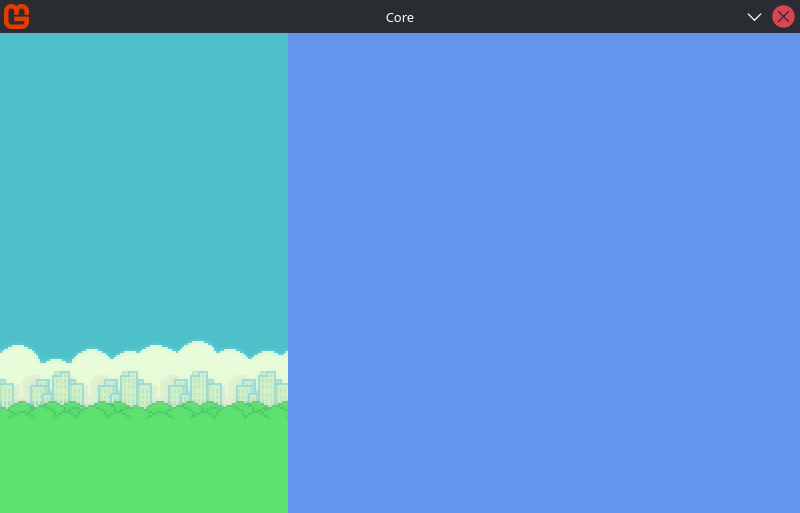
Yeah, this one drew just a piece of that big texture.
Texture packing
I think this is a good oportunity to talk a little about texture packing.
Do you remember about that thing I said during the batching process of the SpriteBatch? More specifically that the draw is done (the data is flushed to the gpu) when End() is called, the SpriteBatch becomes full or when the texture change?
When the texture changes the SpriteBatch will flush the data already accumulated and will restart to batch it again. And this is a problem because sending data many times (in a small interval with highly frequency) unnecessarily to GPU like this is costly and sooner or later it will become a performance issue.
There is some solutions for this problem, one of them is reordering your Draw calls:
Reordering the Draw calls
What we will do here is simply try to reduce the amount of state changes:
# from (3 state changes)
Draw(textureA, ...)
Draw(textureB, ...) # state change
Draw(textureA, ...) # state change
Draw(textureA, ...)
Draw(textureB, ...) # state change

# to (1 state change)
Draw(textureA, ...)
Draw(textureA, ...)
Draw(textureA, ...)
Draw(textureB, ...) # state change
Draw(textureB, ...)
😵💫 State changes here usually means early flushes.
The problem with this approach is that the order matters:
Draw(textureA, ...)
Draw(textureB, ...) # this sprite will be drawn over the previous one
When you reorder your Draw calls like this you could break that effect of "depth" if you are developing a top-down game, for example.
Region of a texture
What you will do is simply: take your sprites and merge them into one single image and draw just a piece (a region) of the entire texture:
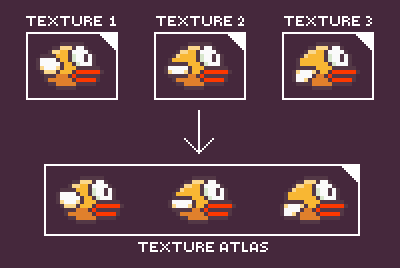
This approach can be "problematic" when you have many big textures because organizing them in the atlas can be a pain in the ass, but for most of the cases, like usually with sprites it is the preferable option.
💡 Actually, the pain in the ass is creating the atlas by hand, but (fortunatelly) exists some tools that already does this for us (and even have integration with MonoGame). We'll use one in future courses 😉.
The overloads of the Draw method that accepts a source rectangle allows us to specify the region of the entire texture that we want to draw.
Considering the spritesheet that we are using to develop this game, we can draw the frames of the bird and a pipe in this way:
_spriteBatch.Draw(_texture, new Vector2(20f, 20f), new Rectangle(230, 762, 34, 24), Color.White);
_spriteBatch.Draw(_texture, new Vector2(80f, 20f), new Rectangle(230, 814, 34, 24), Color.White);
_spriteBatch.Draw(_texture, new Vector2(130f, 30f), new Rectangle(230, 866, 34, 24), Color.White);
_spriteBatch.Draw(_texture, new Vector2(180f, 30f), new Rectangle(168, 646, 51, 320), Color.White);
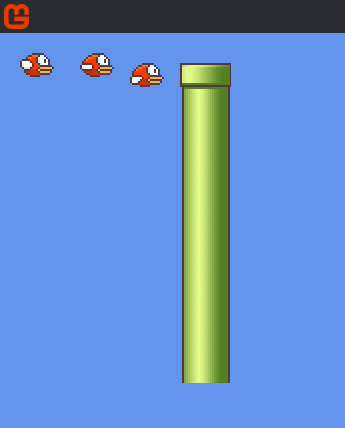
The x and y of the (clipping) rectangle is where the cutout begins (relative to the texture size) in the texture and the width and height are the size of the cutout.
This resolves: texture-related state changes and also you can dinamically change the drawing order.
By the way, we will use this exact approach to animate our bird later.
Rescaling
There is two ways of resizing a sprite in the SpriteBatch: by using the destination rectangle and the scale parameters.
Each one rescale the sprite in differents way:
To easily exemplify the usage of rescaling with the destination rectangle and scale, I will use this texture:

🫣 Yeah, the icon of the game.
Destination rectangle parameter
_spriteBatch.Draw(_texture, new Rectangle(10, 10, 256, 128), null, Color.White);
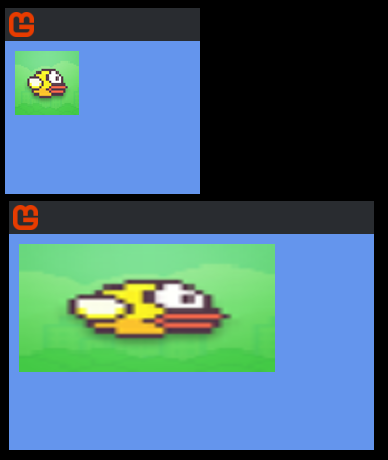
💡 If the image appears blurry after rescaling, set the SamplerState parameter from the SpriteBatch.Begin to PointClamp: _spriteBatch.Begin(samplerState: SamplerState.PointClamp).
The upper image is the normal one (without any scaling) and the lower one is using the destination rectangle overload.
When you use a destination rectangle, the sprite will use the X and Y of the rectangle to set it's own position, which means that now you can only specify the position in integers.
The size of the sprite is set in pixels, exactly as the width and height of the destination rectangle.
The "problem" with this approach is that since now to position the sprite you need to specify the coordinates in integers some movements can look kinda "hard", a problem that you usually don't have when you use vectors (because they use floating point fields).
But despite that, it is really great and useful. We will use this approach to reescale a small white sprite of a square and draw the bounding boxes of some colliders in our game.
I almost forgot to say but have you noticed the null I passed to the source rectangle parameter? This is because in this overload is mandatory that you specify this parameter. Passing null will make the SpriteBatch draw the whole sprite, simple like that.
👻 Curiosity: The MonoGame.Extended package do some tricks with the destination rectangle, rotation and origin to draw primitive shapes since MonoGame doesn't have a ShapeBatch or ShapeRenderer natively.
Scale (and the origin) parameter
The main difference from this parameter to the previous one is that you can keep positioning your sprites with a Vector2, but the scaling is now in unit scale and it consider the origin point of the sprite:
Vector2 origin = Vector2.Zero;
float scale = 2f;
_spriteBatch.Draw(_texture, new Vector2(100f), null, Color.White, 0f, origin, scale, SpriteEffects.None, 0f);
🥸 There is a lot of parameters here but the ones relevant for us during this course is: float scale, Vector2 scale and Vector2 origin.
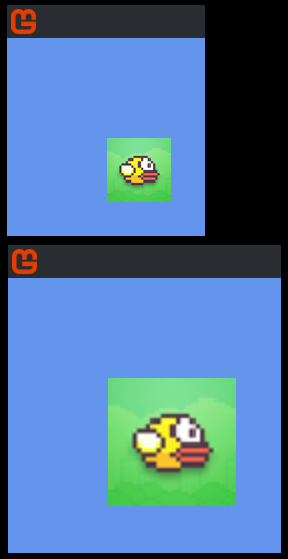
The upper image is the sprite without any scale applied and the lower one is the one with the scale applied... as you have probably seen. 😴
The first thing to note here is that, in comparison with the destination rectangle parameter, just by setting the scale to 2 makes the sprite looks twice of it's original size, and that is the fact. Setting the scale to 0.5 will make it look half of its original size and so on.
💡 1.0 "would be" the default scale for the float scale and Vector2.One to the Vector2 scale.
And the second thing is that the image is being scaled by it's top-left corner. I mean, you probably have noticed this with the destination rectangle parameter also, but differently, here you can change from where the sprite will be reescaled:
Vector2 origin = _texture.Bounds.Size.ToVector2() / 2f;
float scale = 1f;
_spriteBatch.Draw(_texture, new Vector2(100f), null, Color.White, 0f, origin, scale, SpriteEffects.None, 0f);
Interesting, right?
The origin is meant to be set in pixel coordinates. What I'm doing with _texture.Bounds.Size.ToVector2() / 2f is taking half of the size of the texture in pixels.
💡 The direct equivalent would be: origin = new Vector2(32f), because the texture is 64x64.
This will put the origin of the sprite at the center.
By the way, there is another struct in MonoGame similar to the Vector2: Point. The main difference between them is that the fields in the Vector2 are in float and the ones in the Point are int.
Some data like the size of the texture or the position of the mouse is stored in a Point, not a Vector2.
The method ToVector2() converts the Point into a Vector2.
Yeah, something like the ToString() ;)
Rotating
Taking advantage that I mentioned about origin, you can use the rotation parameter to... rotate your sprite:
float angle = MathHelper.ToRadians(45f);
_spriteBatch.Draw(_texture, new Vector2(100f), null, Color.White, angle, origin, 1f, SpriteEffects.None, 0f);
The angle is set in radians and yeah, the origin also influences the rotation.
I don't will use the rotation parameter in this course, but after it, maybe you can do something interesting with it.
Setting up the window size
Ok let's back to the goal of this course.
First, lets change the size of the window, I want to simulate a smartphone (portrait) resolution.
You can change the resolution of the screen/window changing both _graphics.PreferredBackBufferWidth and _graphics.PreferredBackBufferHeight
If you change these parameters within the constructor the result is immediate but, if you set them outside the constructor, like in the Initialize you must call _graphics.ApplyChange()
Actually, for any change that you make in _graphics outside the constructor you must call ApplyChanges().
# in the constructor ApplyChanges() isn't necessary
public Game1() {
    ...
    _graphics.PreferredBackBufferWidth = 288;
    _graphics.PreferredBackBufferHeight = 512;
}

# outside the constructor it is necessary
protected override void Initialize() {
    ...
    _graphics.PreferredBackBufferWidth = 288;
    _graphics.PreferredBackBufferHeight = 512;
    _graphics.ApplyChanges(); // needed!

    base.Initialize(); // don't remove this! I explain why in the first chapter
}
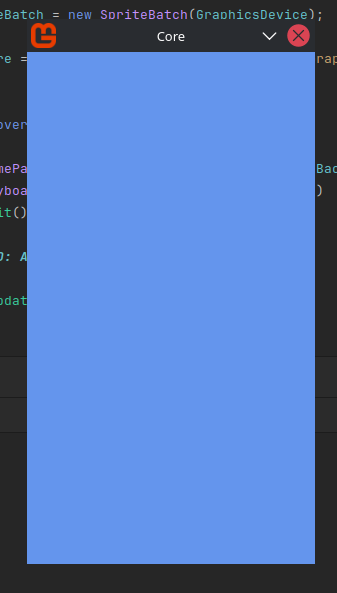
By default the resolution that MonoGame set is 800x480.
Drawing and Scrolling the Background
After everything I've shown previously, this should be straight:
public class Game1 : Game {
    ...
    private float _bgScrollSpeed = 1f;

    private Rectangle _bgSrcRect = new Rectangle(0, 0, 288, 512);
    private Vector2 _bgPos;

    ...

    protected override void Update(GameTime gameTime)
    {
        ...

        _bgPos.X -= _bgScrollSpeed;
        if (_bgPos.X + _bgSrcRect.Width < 0f)
            _bgPos.X = 0f;

        ...
    }

    protected override void Draw(GameTime gameTime)
    {
        ...

        _spriteBatch.Begin(samplerState: SamplerState.PointClamp);
        _spriteBatch.Draw(_texture, _bgPos, _bgSrcRect, Color.White);
        _spriteBatch.End();

        ...
    }
}
The idea is simple: we are just moving the image by 1px per frame and when the right side of the image (x + width) reaches 0 (left bound of the screen) we just reset it's X position.
To make it look infinite we just need to duplicate the drawing and reposition it:
public class Game1 : Game {
    ...
    private float _bgScrollSpeed = 1f;

    private Rectangle _bgSrcRect = new Rectangle(0, 0, 288, 512);

    private Vector2 _bgPos1;
    private Vector2 _bgPos2 = new Vector2(288f, 0f);

    ...

    protected override void Update(GameTime gameTime)
    {
        ...

        _bgPos1.X -= _bgScrollSpeed;
        if (_bgPos1.X + _bgSrcRect.Width < 0f)
            _bgPos1.X = 0f;

        var windowWidth = _graphics.PreferredBackBufferWidth;
        _bgPos2.X -= _bgScrollSpeed;
        if (_bgPos2.X + _bgSrcRect.Width < windowWidth)
            _bgPos2.X = windowWidth;

        ...
    }

    protected override void Draw(GameTime gameTime)
    {
        ...

        _spriteBatch.Begin(samplerState: SamplerState.PointClamp);
        _spriteBatch.Draw(_texture, _bgPos1, _bgSrcRect, Color.White);
        _spriteBatch.Draw(_texture, _bgPos2, _bgSrcRect, Color.White);
        _spriteBatch.End();

        ...
    }
}
We are setting the initial position of the second background to the exact right side of the first one then we scroll it by 1px per frame and when the right side of the second drawn reaches the right side of the screen edge we reset it's position to where it was initially.
I mean, while the first drawn is scrolling to the outside of the screen, the second one is scrolling into the screen.
When the first drawn is entirely outside of the screen it moves back to it's initial position, likewise, when the second drawn outside of the screen is entirely within the screen (visible) it moves back to where it was before.
Giving us this beautiful infinite scroll effect.
I said more here than in the first part? 🤔
Well, anyway, if you read so far thank yoooou so much 😍 for the effort. I know, some parts here are incorrect, or are unecessary, or maybe confuse, but despite that I hope I managed to help you in something 🧡.
In the next chapter we will draw the ground and also start to implement the pipes, see you soon 👋.
Next chapter: Drawing the Ground and Implementing the Pipes (Part 3)