Creating the Project and Understanding the Game1 Class
Hello, I'm Lyiar!
In this set of posts my intetion is to introduct MonoGame for you. I mean, perhaps I manage to teach you MonoGame while we develop a simple game called Flappy Bird.
Actually this set of posts would become a video, but since I was having difficult writing the script I decided to turn all this thing into a set of posts and later compile them into a single video 😵💫.
Demo of the project done:
🧡 You can access the Source Code on GitHub.
Summary:
- Installing MonoGame and Creating a Project
- Templates and its rendering backend
- Opening the project
- SpriteBatch and... batching
- Initialize, LoadContent and the GraphicsDevice availability
- Fixed time step and How do I change the FPS?
- UnloadContent and Dispose
Installing MonoGame and Creating a Project
Ok, for develop with MonoGame we need a project that already contains MonoGame... Actually, you can set MonoGame manually by adding the necessary packages into a Console application, but we can avoid doing this everytime we want to develop with MonoGame by instantiating one of it's templates.
If you don't have MonoGame installed you can learn how to install it by following MonoGame's documentation. Look for the sections about "Setting Up" in Mac OS, Linux or Windows. There you'll find informations more reliable than here about this step.
And why not to mention that I'm considering that you already familiar with programming and CSharp which means that I don't will teach about the language. If you don't know nothing about CSharp or even nothing about programming 😳 here are some suggestions:
- C# Tutorial - Full Course for Beginners - FreeCodeCamp (YouTube, English)
- Curso de C# - Aprenda o essencial em 5 HORAS - Victor Lima (Youtube, Brazilian Portuguese)
- Learn C# (Microsoft's Documentation, English and Portuguese)
- Introduction to C# (Microsoft's Documentation, English)
- C# Fundamentals for Absolute Beginners (Microsoft's Documentation, English)
Okidoki, considering that you have the templates installed lets instantiate one:
dotnet new mgdesktopgl -o FlappyBird
If you don't know or don't remember from where I take this
mgdesktopgl
word, you can list them all
by running
dotnet new list:
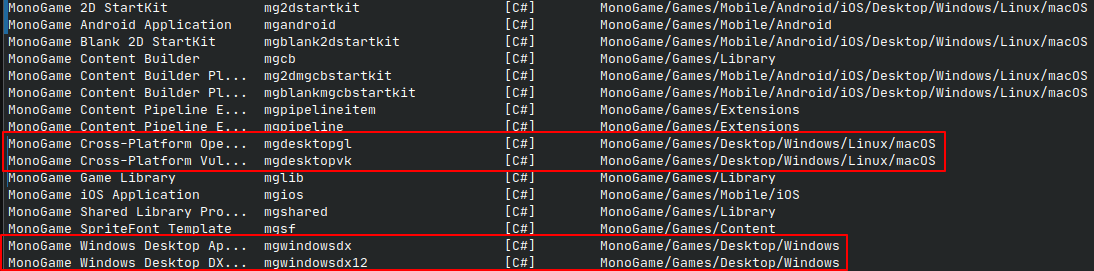
The template relevant for us right now is the
mgdesktopgl
that will setup our MonoGame project to work with OpenGL. We don't will work with OpenGL directly, but it is the one
that will be used under the hoods.
Templates and its rendering backend (skippable)
Since I mentioned OpenGL: the other templates
mgdesktopvk
(MonoGame 3.8.5+ only),
mgwindowsdx,
mgwindowsdx12
(MonoGame 3.8.5+ only),
mgandroid
and
mgios
as the
vk
or
android
words suggests, them are for another
platforms (like mobile) or use other rendering backend than OpenGL.
To work with the android and iOS template you'll need more dependencies than simply installing the templates, you can have a bit more information in MonoGame's documentation about this.
The template that ends with vk (stands for VulKan) expects that you graphics card have support for this technology. According with MonoGame's blog, the idea is that this template replace the one with OpenGL in the future since some platforms like Mac OS despite having support for OpenGL, it is more for compatibility than for... resources? Well, anyway, the template with OpenGL is the one that currently we have a guarantee that will work in almost all platforms.
Finally, the templates that ends with dx and dx12 (stands for DirectX) use DirectX (the template without a number uses dx11) as rendering backend and only works in Windows. I mean, if you instantiate this template, you'll be unable to compile it since it will need a windows version of the dotnet core.
Opening the project
Nice, if you load your project into some code editor like VSCode you will see three things: the
Content
directory, the
Program.cs
and also
Game1.cs
classes. Actually, have
more than this, but these three (or two) are the relevant for us.
The
Program.cs
is the entry point of our project, I'm not sure if is common to change something in this class, to this day I still
haven't needed to change it.
This is what we have in
Game1.cs:
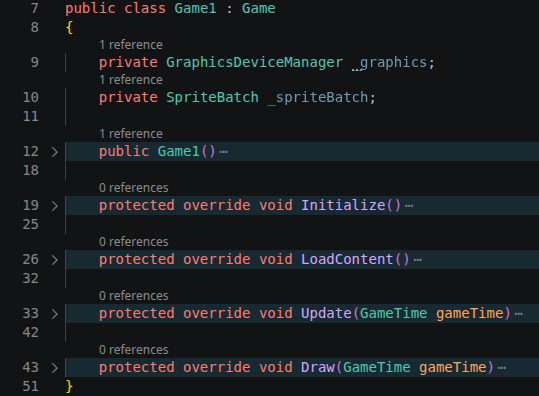
This class is where we usually develop our game.
We have some things here:
The first field in the class (in the line 9), the
GraphicsDeviceManager
is the component responsible for getting some valid graphic context, set some configurations for us (like setting the
initial window size and enabling vsync) and also provides for us the
GraphicsDevice
component.
GraphicsDevice
is the layer that MonoGame provides for us to speak with the graphics context available for our application. Since our
template is setup with OpenGL, the
GraphicsDevice
will be our high-level layer to work with OpenGL.
We could create buffer objects, setup vertices and indices, textures and shaders and do the work of the
SpriteBatch
without the
SpriteBatch
thanks to the
GraphicsDevice
and a bit more easily than working with OpenGL directly.
I don't inteed to reimplement a
SpriteBatch
here, it will demand some work that I don't want to try
to explain right now. The MonoGame's
SpriteBatch
implementation is really well made and optimized,
so unless we really need something that MonoGame's
SpriteBatch
don't provides, we'll stick with it.
By the way, since we mentioned the
SpriteBatch, look a reference of one in our class (in the line
10). The
SpriteBatch
is a class (or helper) that MonoGame's provide for us to draw (easily) textures, or pieces of a texture usually called
as sprite.
SpriteBatch and... batching (skippable)
The word "batch" in the class name points to the way that this class works. Look this code:
_spriteBatch.Begin();
_spriteBatch.Draw(_texture, ...);
_spriteBatch.Draw(_texture, ...);
_spriteBatch.Draw(_texture, ...);
_spriteBatch.End();
What will happen here?
Well, depending on your knowledge about this subject, maybe you're coming from
Pygame
and you're thinking right now:
Hum... idk what
Begin()
and
End()
are doing, but each
Draw()
is drawing... the
_texture... right?
Yeah, of course... Btw, since I mentioned Pygame, I'll use it as reference here.
In Pygame you usually draw (or blit) textures in this way:
surface.blit(imageSurface, position)
surface.blit(imageSurface, position)
surface.blit(imageSurface, position)
For each
blit()
you have a draw call. If you call
blit()
a thousand of times, you will
have a thousand draw calls.
SpriteBatch.Draw()
in the otherhand will accumulate all the information needed to draw our texture and will indeed draw it only in the
future (usually when
End()
is called).
Pygame's bliting is just a copy of pixels from some surface to another surface and this operation is made entirely by the CPU (I'm not considering Textures, since most of the tutorials about Pygame out there are still using surface blitting).
MonoGame do the entire operation with the GPU. In order to draw with the GPU you need to provide some information like vertices (position, color, texture coordinates) and some valid shader (I'm being suuuuper brief here ok?). The problem is that sending information to the GPU can be costly specially if you need to do this with a high frequency in small intervals. There are some things that you can do to mitigate this overhead like accumulating the many informations as you can and send them at once to the GPU and/or try to reorder your statements to reduce state changing.
Briefly: state change is the need for the GPU and the graphics driver to reconfigure itself when something change like when you are drawing two different textures and this operation, is costly. Costly in the sense that many of this overhead accumulated would result in low FPS.
Ok, do you remember what I said about "accumulating the many informations as you can and send at once to the GPU"?
This is exactly what the
SpriteBatch
does. Instead of drawing each texture in the moment that
you call
Draw(), internally, the
SpriteBatch
will accumulate all the information needed
to draw our texture and will draw it when:
End()
is called or the internal buffer becomes full or
when the texture changes.
The next part of our
Game1.cs
class is the constructor. If you check inside of it you will find:
public Game1()
{
    _graphics = new GraphicsDeviceManager(this);
    Content.RootDirectory = "Content";
    IsMouseVisible = true;
}
Considering what I said earlier, the first line within the constrcutor here should be direct.
Content.RootDirectory
is the place where MonoGame will look when you are loading some asset with the
ContentManager.
"Content"
is the name of the directory that MonoGame will look into for assets. You can use any other name here, but this is
usually the default.
IsMouseVisible
sets the cursor visibility that, by the way in the old XNA this parameter were set as false by default (cursor
hidden).
Right, next we have the methods
Initialize,
LoadContent,
Update
and
Draw.
Initialize
runs right after the constructor and then
LoadContent
is called (by the
Initialize).
Initialize, LoadContent and the GraphicsDevice availability (skippable)
By the way, do you remember about the
GraphicsDevice
I mentioned earlier? Most of the graphical
things in MonoGame depends on a valid
GraphicsDevice, and despite we instantiate the
GraphicsDeviceMananger
inside the constructor, the
GraphicsDevice
that it provides for
us is only indeed available after the constructor, beginning in the
Initialize.
So knowing this you can even remove the method
LoadContent
and initialize and load everything from
the
Initialize
method... but, why we usually don't do this (I mean, if you look some MonoGame, FNA or XNA code out there you will see
that this isn't very common)? probably
convention, most of the projects follow this convention: you initialize/create things in the initialize
and load resources (specially the ones that depends on the ContentMananger) through the
LoadContent.
What can I say about this? Well, is the project you are currently working entirely yours? only you will read and write in it? If this is the case, do whenever you want. Otherwise, if you know that in some moment someone will contribute with your code or you want to share it (the code more specifically) with the community, then just, follow the convention, no one will get hurts 🧡.
Later we have the
Update
and
Draw
methods.
The
Update
method is called after the
LoadContent
at last once and then the application
enters in the game loop and then
Update
and
Draw
pass to be called in loop: where you
will have
Update
and
Draw
being called in loop until you application ends.
Fixed time step and How do I change the FPS? (skippable)
I'm not sure about this (I'm sorry, perhaps I interpreted the section about the game loop in this
diagram
incorrectly), but apparently when
IsFixedTimeStep
is
true
(this is the default, by the
way) the
Update
is called multiple times before the
Draw
until the interval set in
TargetElapsedTime
be reached. But if it is set as
false
then you will have the classic
Update
followed by a
Draw
for every frame.
In short, when
IsFixedTimeStep
is set to
false
you have a guarantee that the game loop
will be something like:
Update -> Draw -> Update -> Draw
But when it is set to
true
the only guarantee that you have is that just after some update you will have a draw, but until there you can have
multiple calls to update before the draw:
Update -> Update -> Update -> Draw
By the way,
IsFixedTimeStep
and
_graphics.SynchronizeWithVerticalRetrace
(VSync) are
set to
true
by the default and
TargetElapsedTime
is set to
1.0/60.0
(or 60
UPS).
According with my test changing the
TargetElapsedTime
change how many updates you can have per frame
in your application, but not the FPS.
By default, with
IsFixedTimeStep
and vsync set to
true
your game will always (try) to
run at 60 UPS and FPS.
Changing the
TargetElapsedTime
will only change the UPS. If you indeed want to have a FPS different of 60 you will need to disable the VSync. Disabling
the VSync will make the FPS synchronize with the Update rate which means that if you set your game to have 120 UPS, for
example, with vsync set to
false
you will
also have 120 FPS.
Yeah, you cannot set the FPS individually, but perhaps in most of the cases you don't even need to change these settings, I just mentioned this because... idk, perhaps someday you will be doing something really special that gives you the need of changing these properties, so knowing about this could be helpful, right? 😅
UnloadContent and Dispose
Finally, I didn't mentioned initially but there are also other two methods that we can override and are very useful:
the
UnloadContent
and
Dispose
methods.
UnloadContent
is the opposite of the
LoadContent, you would use this method to unload
asssets loaded with the
ContentManager. This method runs before the
Dispose. For
example:
protected override void UnloadContent() {
    Content.UnloadAsset("my-texture"); // will unload just the specified asset
    Content.UnloadAssets("my-texture", "my-sound"); // will unload the assets specified.
    Content.Unload(); // will unload all the assets
}
And finally
Dispose
is the method where you usually freed those resources that the gargabe collector don't have direct control. So you need
to explicitly free them (by calling its
Dispose
method). For
example:
protected override void Dispose() {
    _spriteBatch.Dispose();
    _texture.Dispose();
}
Nice, if you read this far, thank yooooou so much. I know, many times I end up getting excited and talking more than I need but despite that I hope all this was useful for you 😊.
In the next chapter we will draw things, more specifically a background and scroll them infinitely through the screen, see you soon.
Next chapter: Loading a Texture and Drawing the Background (Part 2)